I originally own a blog on WordPress, where I share my knowledge and experience as a web developer. Now that I've spent almost 3 years working on it, I decided to start a new blog with modern tech stack.
After struggling for a few months, I managed to deploy this blog which is my very first Next.js project. In this article, I'm gonna briefly explain how I built this MDX blog with Next.js.
This article is not a step-by-step guide or tutorial. I'll post an another article for that topic.
Tech Stack
Here's the list of the tech stack I used for this blog, and I'll explain why I chose them.
Next.js
Next.js is a React framework for building web applications. I chose Next.js for the following reasons.
- It is built with React
- It offers two types of pre-rendering: SSR and SSG
- It has many performance optimizations
- It works great with MDX
For pre-rendering options, I use SSG (Static Site Generation) because my blog contents are totally static. It generates the HTML at build time, and it will be reused on each request, unlike SSR that generates the HTML on every request.
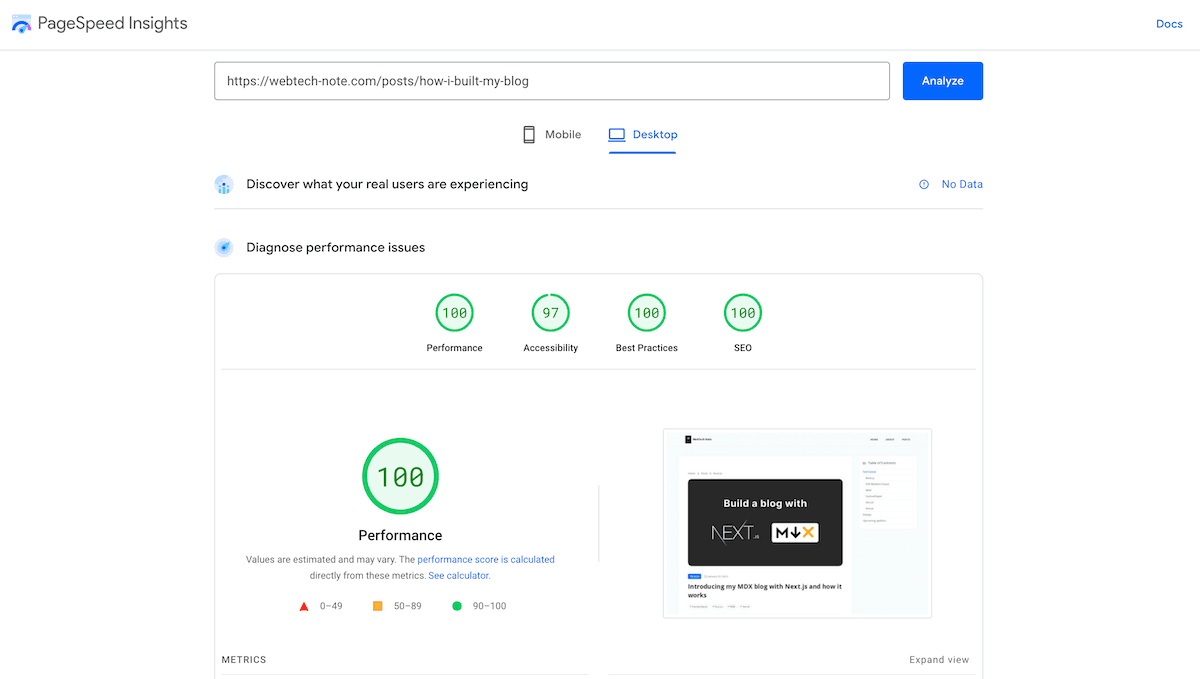
On top of SSG, Next.js has so many performance optimization such as code-splitting, next/image, next/font, next/script, etc.
These features make the website super fast.
CSS Modules (Sass)
For styling, I used CSS Modules with Sass. Next.js has built-in support for CSS Modules, and you can use Sass by simply installing sass package.
By adding .module.scss at the end of a file name, you can write a component-scoped styles with Sass features like nesting, variables, and mixins. Also, you don't need to worry about class name conflicts thanks to scoping.
I write all the styles by myself because it's much more flexible than using CSS libraries like Bootstrap. For now I'm satisfied with CSS modules and Sass, but I will probably try some of CSS in JS libraries like Tailwind CSS or Emotion in the future.
MDX
MDX is a format that allows you to include JSX in Markdown documents. This means you can import and use custom React components in markdown files.
I actually thought about using headless CMS for managing contents, but I didn't like the idea of writing contents in the editor, because the variety of the parts you can use are limited and it would be so hard or impossible to create and use custom components.
In MDX, there's almost no restriction on what you wanna show in the articles. If you want some custom blog parts, you can simply create a component, include it and use it in a mdx file.
To give you an example, I have a Box component for wrapping the contents with a certain background color depending on the value of type props. In MDX, I use a component like this:
<Box type="success">This is a box component.</Box>When this is rendered, it looks like below:
This is a pretty simple component, but you can create more complex and interactive components and include them wherever you want.
Contentlayer
Contentlayer is a content preprocessor that validates and transforms your content into type-safe JSON you can easily import into your application.
I use Contentlayer as a content processor. It converts my mdx files into type-safe JSON data, and I can easily import them in any pages.
I have tried @next/mdx, mdx-bundler, next-mdx-remote, but none of them were better than Contentlayer in terms of the amount of code you have to write, and many other advantages such as the following:
- Convert contents into data
- Easily import data just like you import libraries or components
- Automatic type definitions
- Built-in validations for your content & frontmatter
- Error messages in console for debugging
- Live reloading
Another good thing is that they show how to set up everything using Next.js in their documentation, so all you need to do is just to follow the guide and you will have a MDX blog with Contentlayer and Next.js.
giscus
Giscus is a comments system powered by GitHub Discussions. By using giscus, you can set up a comments section without having to prepare a server by yourself.
The visitors can leave a comment or a reaction by signing in with a GitHub account, and all the comments and reactions are stored in GitHub Discussions.
I wrote an article about how to set up giscus with Next.js project, so check it out if you are interested.
How to add comment system using Giscus in Next.js
Giscus is a GitHub Discussions-powered comemnt system. I'll explain how to install and set up giscus in a Next.js project.
Vercel
Vercel is a cloud platform for serverless deployment, created by the Next.js team.
I simply chose it because Vercel's platform and Next.js are developed by the same company, and I thought they would work well together.
Vercel is the fastest way to deploy your Next.js application with zero configuration.
When deploying to Vercel, the platform automatically detects Next.js, runs next build, and optimizes the build output for you.
To deploy my site, all I need to do is to push my projects to the main branch in my Git repository. Then, Vercel will automatically create a production deployment.
For a custom domain, I bought one on Google Domains but you can also buy it through Vercel.
Design
I designed all the contents in my blog, including thumbnails of the posts. This design part was really hard for me because I'm not very experienced in design. So I got some ideas from other websites, mainly from Next.js documentation.
As a non-designer, I don't know many principles or rules in design, so I tried to stick to the rules I made.
- Minimize the color usage
- Use enough white space between content blocks
- Avoid over-decorating
Although the design might be too simple or a little bit boring, I am satisfied with the current design for now. I will probably redesign once I come up with a better idea.
Upcoming features
Here's the list of upcoming features that I'm working on.
- Add a contact form
- Add pagination
- Create a like button on each post
- Convert JavaScript into TypeScript
If you have any requests or questions, please leave a comment or send me a message on Twitter.